Tutorial: How to create Panoramas
While showing you a little inside into my editing process some of you asked me, how I create those panoramas. And today's post is all about that! I’ll start with my personal reasons on doing it, followed by a list of things you need (to consider), then describe the rough process step by step & later tell you how you put it all together.
PANO-WHAT?
Segmented panoramas, also called stitched panoramas, are made by joining multiple photographs with slightly overlapping fields of view to create a panoramic image. (wikipedia)
So basically a panorama is the outcome of the combination of several pictures. This could be three single pictures combined or 20 or even more (as long as your hardware & programs can handle it).
There’s also this famous technique after Ryan Brenizer. But this one mostly focuses (hehe) on a way to create pictures with an interesting depth of field. And I wanna talk about the basic steps today - but I can recommend you to look into this specific technique too!
OKAY, BUT WHY?
First of all you may ask yourself why you should take a panorama when you just could use the right lens. Well, here are two reasons:
1) LAZINESS
Sometimes I’m too lazy to switch lenses. Or the weather doesn't allow it due to rain or wind. Or I don't have the right lens with me, because my camera backpack already is quite heavy. So I simply capture the whole scenery with the lens I have with me.
2) COMPRESSION
A thing I really love is playing with the image compression of long focal lengths. The longer the focal length, the closer your main subject seems to be to the fore- & background. So combining both techniques can be even more fun & can definitely help to give your pictures a different look.
SOME EXAMPLES:

Left: Panorama (3 pictures) taken with 50mm - Right: Single shot taken with 35mm.
I think you can definitely tell the difference of the looks of both lenses. Sadly I couldn't find an example shot with a real wide-angle lens. But maybe this gives you a little feeling for what I mean.

Panorama (6 pictures) & single shot, both taken with 70mm.
Loved the compression here. But I also loved the warm colored foreground. So I wanted to combine both.

Left: Panorama (6 pictures) - Right: Single shot. All taken with 50mm.
This is a good example of how much more you can get out of your pictures with this simple technique.

Left: Panorama (18 pictures) with 120mm - Right: Single shot with 24mm
I guess this panorama is the biggest one I present you in this blogpost. I remember that I wanted to try to capture this very scenery with a very long focal length. Just to see, if it works out. You see, it did. Also it makes my friend Jenny seem to be much closer to the mountains in the back - or the other way around.
WHAT YOU NEED:
Now that you have a first impression of what you can achieve with this technique, here’s what you need:
CAMERA:
As far as I know you can do this with literally every camera. From smartphone to DSLR. Just make sure that everything fits together. More about that under “3. Settings”.
LENS:
Another good thing; it's possible with every one! But I’d say it’s a bit trickier the longer your focal length is. Imagine putting together four pictures taken with a wide angle lens; the chances that the image segments will overlap & fit together are way higher than taking four pictures with 200mm. At least when you hold your camera in your hand - the longer the focal length, the heavier the lens, the higher the possibility you are too shaky & maybe miss to take pictures with a proper overlapping. I mostly use my 50mm lens for panoramas because it’s the one I use the most in general.
SETTINGS:
Here you need to make sure to shoot in manual mode. Many smartphones and digital cameras should be able to do so as well by now. Manual means, you can change the settings for the pictures from ISO, aperture to shutter speed just as you like - and they stay that way until you make further changes. So for taking several pictures for a panorama make sure not to change any of these settings in between, otherwise one half of your panorama looks brighter than the other half - could look weird & it'd be not that easy to getting rid of that afterwards.
TRIPOD:
Well. Maybe you need one. Or maybe you don't. This totally depends on you and your preferences. I usually don't shoot with a tripod, apart from night shots or self portraits. Same with my panoramas. An old fashioned photographer I met at Milford Sound once was completely surprised by that. But long story short: It works both ways. A tripod can be a great help for keeping the right position and shooting the right angles but if you don't have one with you - not a big deal either. I promise.
PLAN:
By that I don't mean to plan ahead before even going out to shoot. More likely to plan what your panorama should look like & which parts of the scenery it should contain.
Imagine standing in a forest & you wanna capture a single tree which stands out to you. Now you need to plan to take pictures of this very tree (obviously) & then how much of the surroundings you also want to have in your final picture. Just the few five trees surrounding tree number one or do you want to capture a wider angle with, let’s say, 30 trees. This sounds way more complicated than it is - more on that later!
TIME:
For your first tries: Take your time. It may takes a while till you figured it out. On the other hand: Taking a panorama of a sunset or if it’s a bit windy time could run for your perfect panorama shot. Imagine start taking pictures for it & half way though you see “Oh, sun has already set” or “Woah, where did that cloud go that fast?”
EXTRA TIP:
I often get confused after taking several panoramas of the same scenery after looking at the folder of pictures to edit them. “Which picture belongs to which panorama? Where does this one ends & where does the other begin?” Either take a “black” shot in between by just putting your hand in front of the lens. Or always take the same “first shot”: So if you take three panoramas of that church, then always start with the front door, or the tower clock, etc for example. Following the same routine will safe you some time later.
EDITING:
I use Adobe Photoshop Lightroom since 2015 and it definitely changed my life (not kidding here). It’s very clever & makes the last step pretty easy. More on that later!
HOW TO SHOOT:
Before you go out & try your best, here are some tips on that:
POSITION:
Keep your camera in one position - don't ever change that during the process! As I said, a tripod can help here but it really isn't a must. Just make sure you stand or sit comfortably & that your hand is steady.
SETTINGS
This part is important so we better talk about it twice! You definitely need to make sure that you shoot it manual mode. Never change any settings between taking the shots. The white balance should stay the same because otherwise some parts of your panorama could look warmer or cooler than others. The fixed settings of ISO, aperture and exposure time make sure that all parts of your panorama are equally exposed.
VERTICAL OR HORIZONTAL?
Well this always depends on the subject & the scenery. If it’s a small panorama out of three pictures like the one down below, I rather shoot vertical. If its a bigger one & containing a lot of pictures I rather stick to horizontal. For me personally it’s easier to get a proper overlap for all the pictures this way.
ANGLE:
Only change the angle (up & down, left & right, diagonal), like I did down below. As you can see I started with the “main” object (middle) and then slightly turned the camera to the left & right.

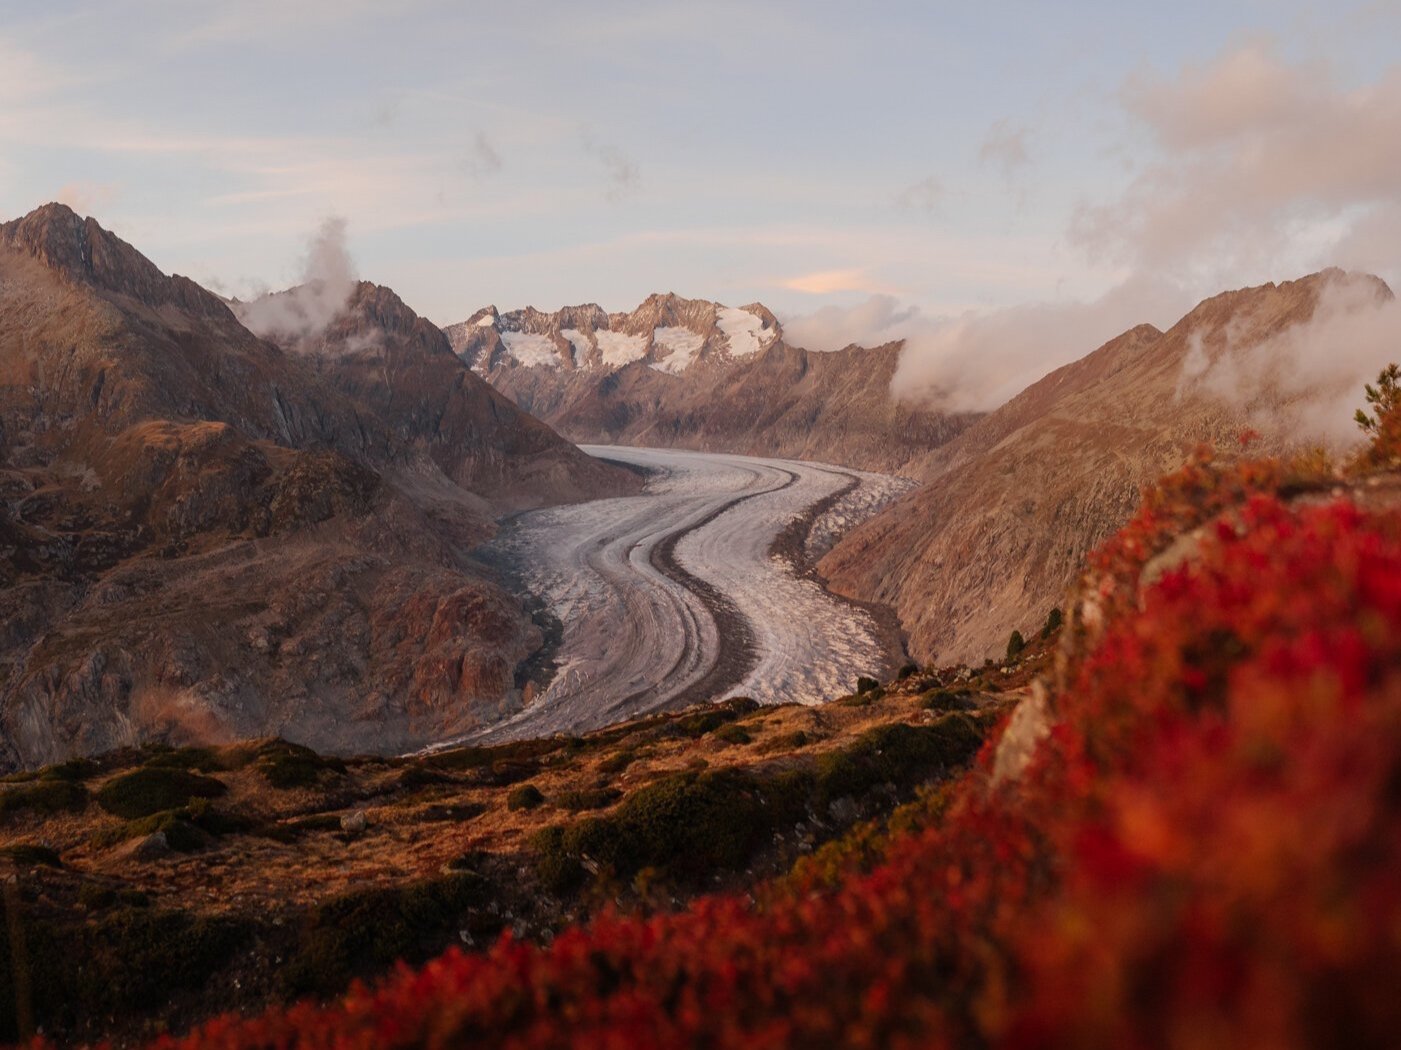
OVERLAPPING:
Make sure your shots “overlap” each other. Each picture must contain information of the one right next to it. As shown above the glacier is part of all three pictures & I just added some more information for the mountains on both sides. This gets a bit trickier the more pictures you wanna combine. This can be a try and error learning process.
TAKE ALL SHOTS:
By that I mean: Don't forget to take a picture from a certain angle. For example I always start with the “main” object in the middle, then go “all around” it. If you forget one picture or certain parts don't overlap, it could end up looking like there is a missing piece; for example like this:

IN CONCLUSION:
So here’s an example of the order of my shooting process. You also see how much overlapping I used - a LOT. It doesn't always have to be that much but here I rather played it safe because you’d instantly see missing overlapping or other mistakes in objects like trees etc.

HOW TO EDIT:
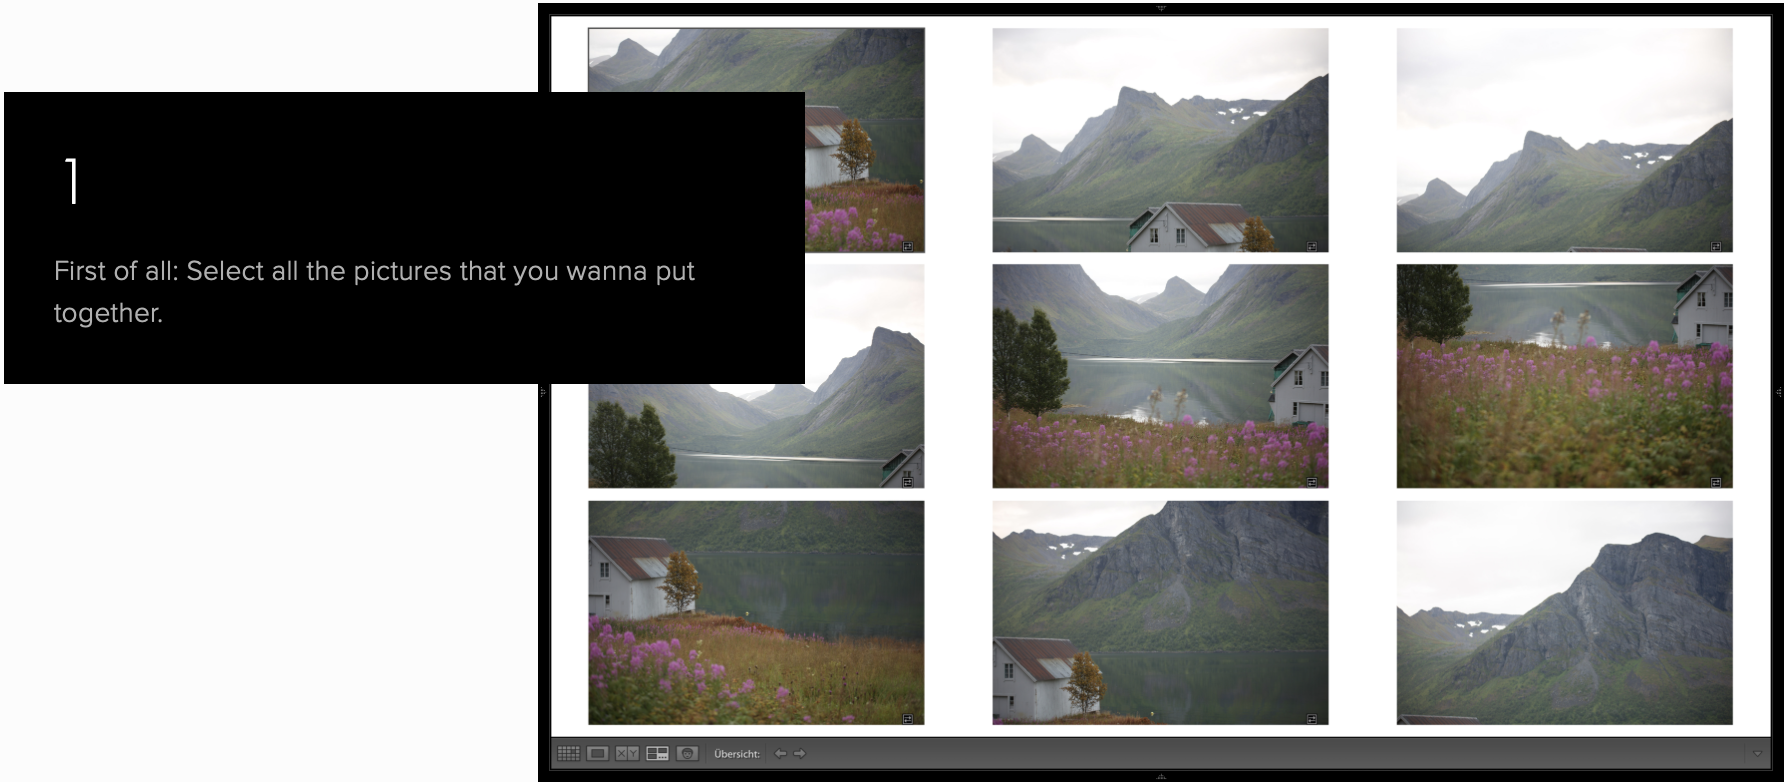
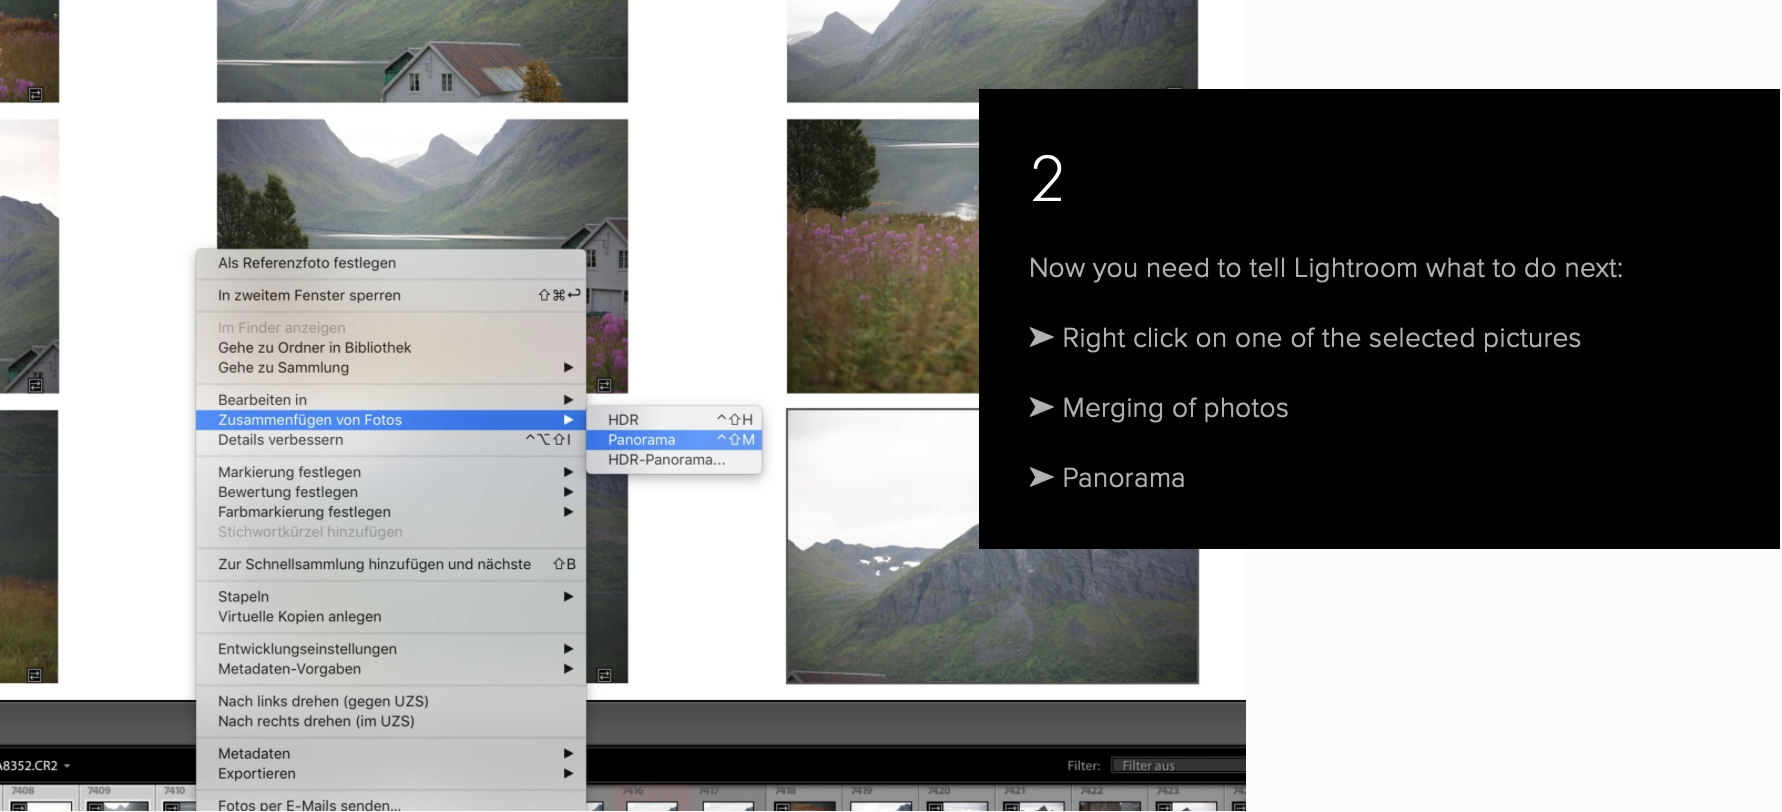
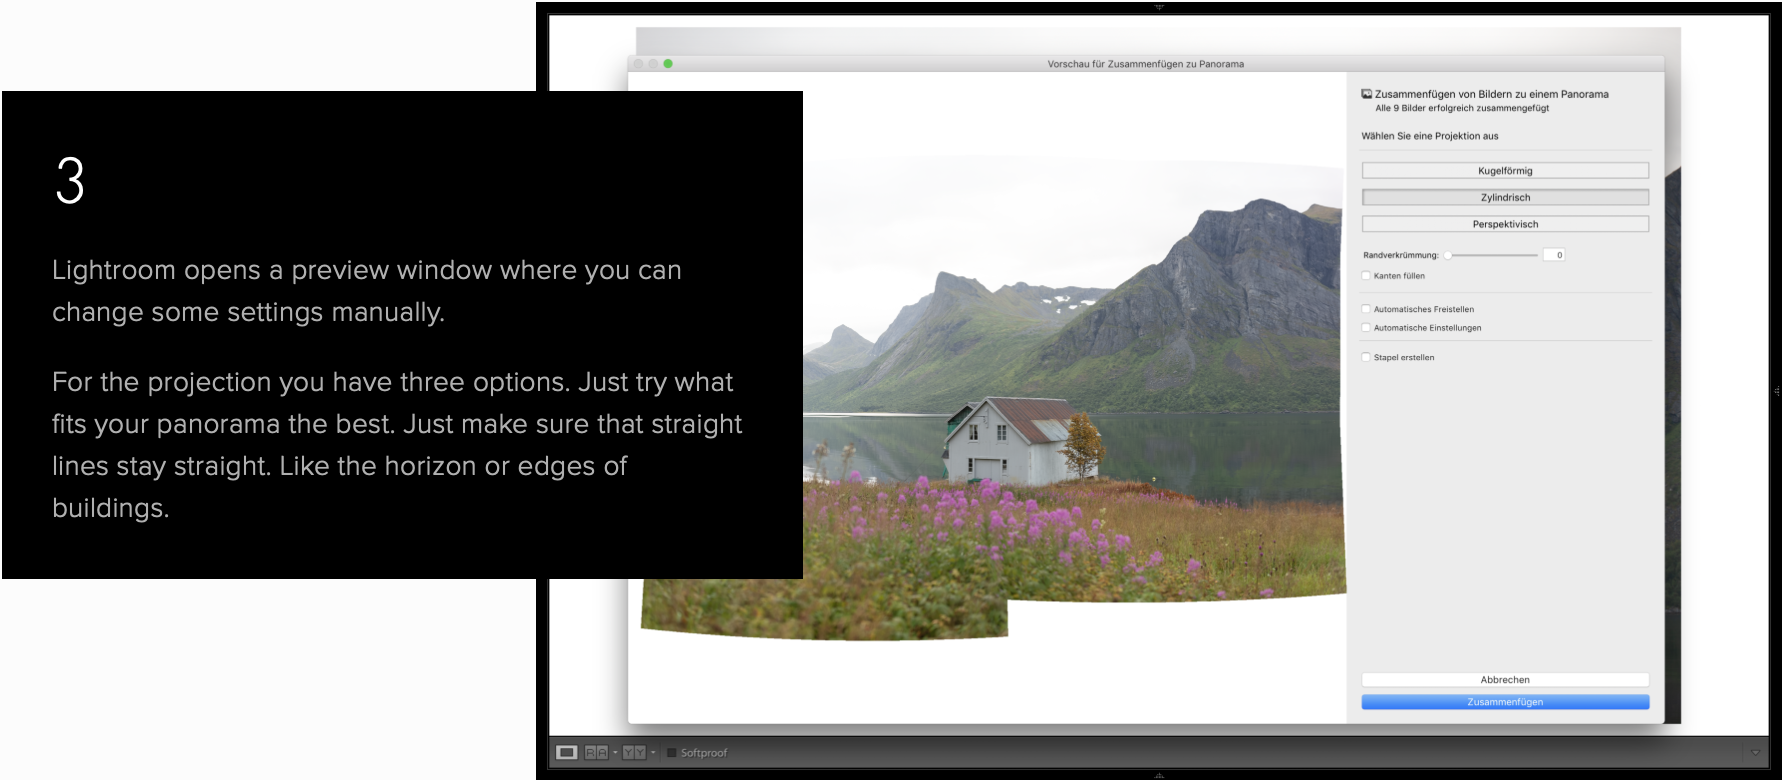
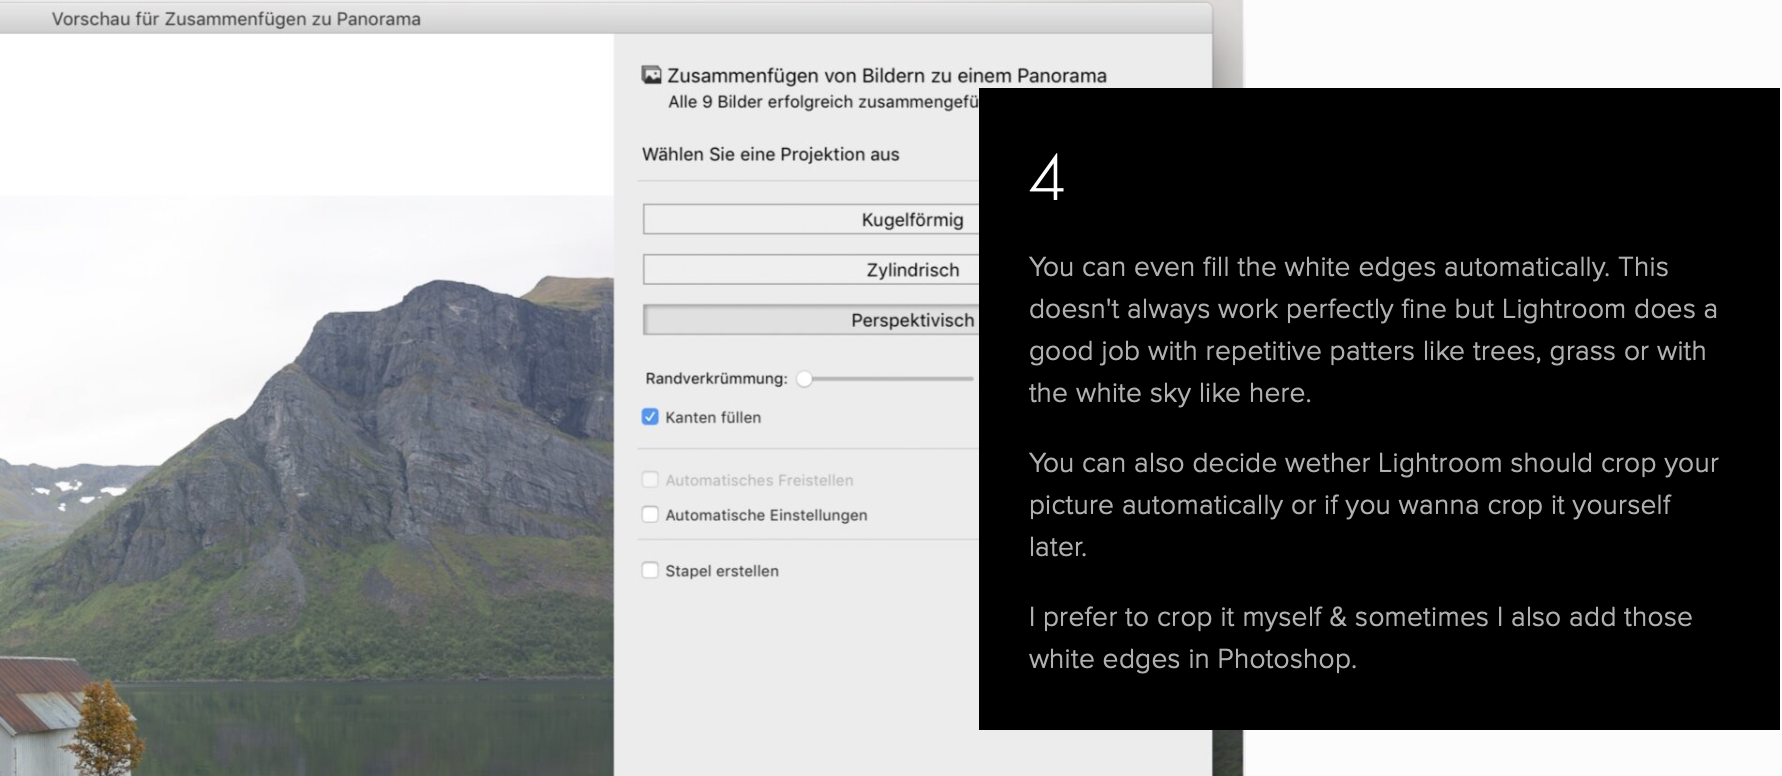
You now know what you need & how to shoot. Here’s a little step-by-step guide for Adobe Photoshop Lightroom :
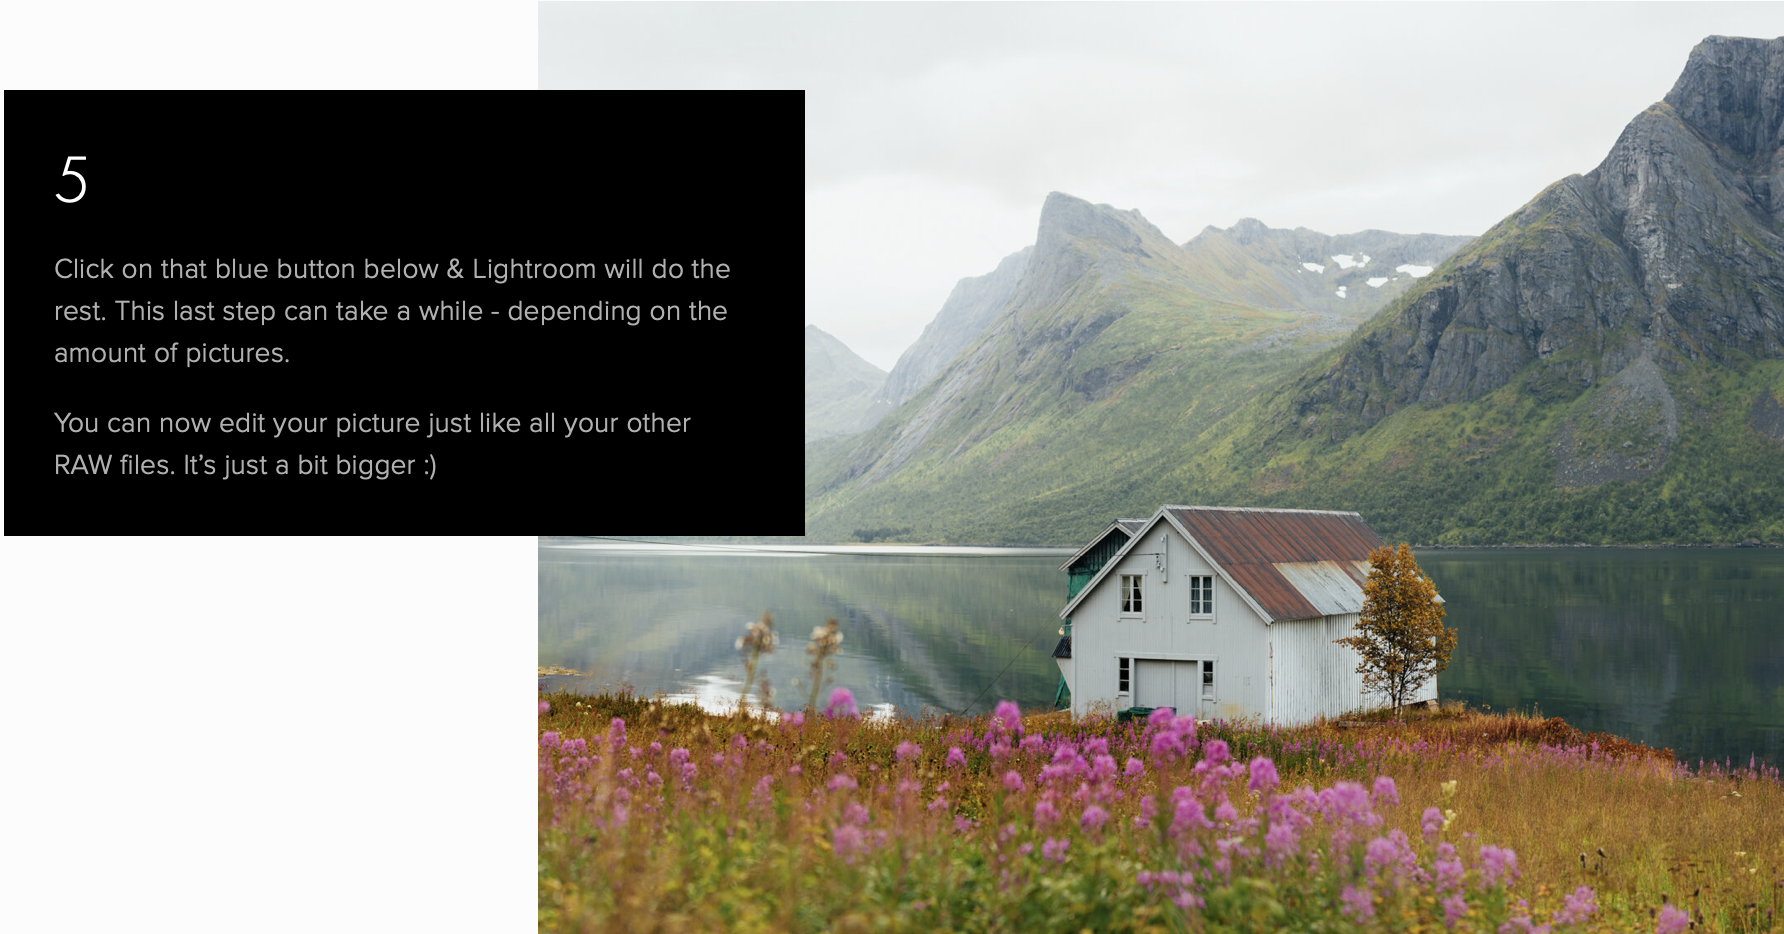
…AND THAT’S IT!
SOME MORE TIPS
Waves are never easy to take panoramas of. They simply move to fast & it’ll end up looking weird because Lightroom cannot put a proper pattern of them together. It’s clever but not THAT clever :D
Same goes with plants who move to fast due to wind or any other things that move around in your scenery. Sometimes the best techniques just doesn't make any sense if the surroundings don't play along.
When you have a “fast” moving object like a car, a person or an animal & you cannot tell them to stop moving: Wait for the perfect moment & take a picture of them in the right place. Stay in this position & wait till they’re out of the scenery you wanna capture. Then go on with your other shots. Otherwise you’d l have a panorama with the same objects just in different places.
As I said the last step of Lightroom combining your images could take a while. I can imagine older laptops could have their problems if its too many pictures.
If you tend to do this too often - just like me - keep in mind that you’ll need more data storage then without doing it because you - obviously - take more pictures. Bring some extra SD cards with you and make sure to get some big external hard drives as well.
SOOO…
…as I already mentioned I use this method quite regularly. Maybe even too often haha. It’s really not that hard & once you figured out the shooting part, you’re only 4 steps apart from your first panorama.
Let me know if you tried it yourself or if you have any questions! Would love to see the results! :)